How To Use FTP To Upload Files
Learning how to use FTP to upload files from your computer to your webhost is not complicated but it can be somewhat confusing if you have never done it before.
 File Transfer Protocol (FTP) is the method used to transfer files, either through your web hosting provider or through the use of free FTP software programs that you can download from the web.
FileZilla is one of the easiest programs to use, which is why we recommend it to new website buildlers.
To install any website, you will need to transfer the website files from your computer to your web host.
There are several ways you can connect to your web host via FTP. You can even use your web browser, but for this discussion we will be concentrating on using the FileZilla software.
First you need to download the software from https://filezilla-project.org/download.php?type=client and install it on your computer.
Then it is simply a matter of entering your password details into the software, connecting up to your web host and dragging the files to the right location in the FTP Software.
When you first open FileZilla the top section that shows your connection status will be blank until you enter your web host information.
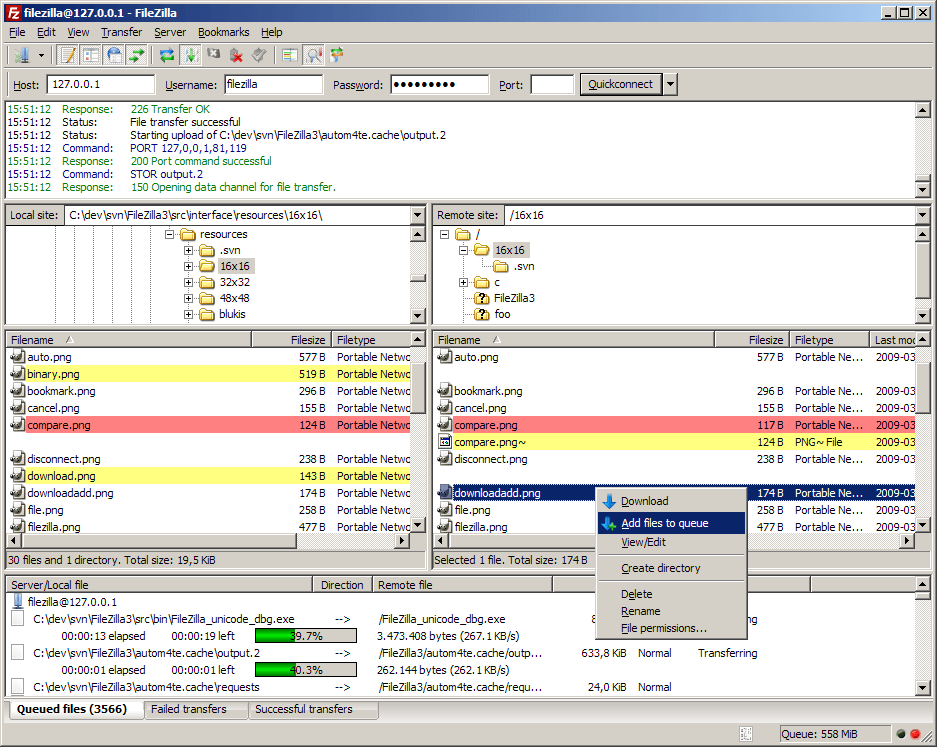
The left hand side of the screen directly under the connection status box shows the location of each of your computer files in your local browser (Windows Explorer).
When you use FTP to upload files, you are simply dragging your computer files from the left side of the screen to your hosting account, which is on the right side of the screen.
If you like you can also drag files from any Windows Explorer window to your hosting account.
To immediately connect to your hosting account, you need to either fill in the input boxes at the top of the screen directly above the connection status box, or since you will likely have more than one website, set up the “Site Manager” feature.
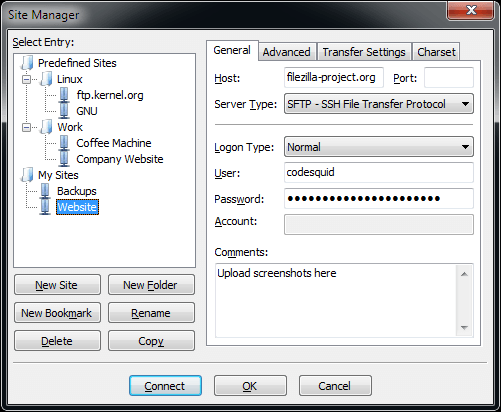
The Site Manager allows you to store your login details so you don’t have to fill it in every time you need to FTP a file.
To configure the Site Manager follow these steps:
At the top left click “File” and the select “Site Manager” from the drop down list.
When the pop up window appears, select “New Site” and then type in the description of the website you are adding. This is simply for you to remember which site you will be working on in the future, so you can type in a nick name, or anything that suits you.
Next you need to enter the information your web host provider sent you in their welcome email when you signed up with them.
You will need the host address (IP address or domain name), your user login, and your password.
Typically you can use your domain name as our host address.
Under the “Logon Type” pull down menu, select “Normal” and type in your user login name and password that your hosting provider emailed you.
After you entered your host name, user login, and password; click “OK” to save the information.
Next click “File” again and select “Site Manager”. Your website should now be listed.
Now you can easily select your site in the left box and click the “Connect” button at the bottom.
If you plan to use FTP to upload files to several websites, you can create folders and then list each individual web site under a different folder name.
After logging in and connecting to your hosting account, a list of files and folders should be displayed in the right hand side column of FileZilla.
You should be able to see a directory called “public_html” in this list.
This directory is linked to your website and files added here will become available on the web via your domain name.
If you upload a file called “seamonkeys.txt”, you will be able to access that file on your website by typing “www.yoursite.com/seamonkeys.txt” into your web browser.
Some hosting accounts may have their website files under a name other than “public_html”, but “public_html” is the one most commonly used. The subfolders inside “public_html” will hold your website files “yourwebsite.com”.
You can test to see if your FTP has worked by uploading a .jpg picture to your site and accessing it via your domain name.
http://www.mysite.com/mypicture.jpg.
Do this by navigating to your “Local site” box on the left hand side of the software and picking any folder that contains a .jpg, .gif or whatever picture.
When you click on any of the “Local site” folders, their files will be unpacked and displayed directly underneath, in the lower left “Filename” box.
Choose which file or files you want to FTP on the left side in the “Filename” box and then on the right side, make sure you have navigated into your public_html (or relevant) directory that you want the file or files uploaded to.
When you locate the correct directory, drag the files to an empty area in the right box on your host or double click on the file or files to start the upload process.
The upload process depending on your connection can take up to several minutes.
When you upload a folder that contains several files, you can monitor the process as the files are uploaded one at a time.
When all the files are copied to your host server, you should see identical contents in both windows (except for the existing files in your public_html directory).
If you want to create a new directory to upload files to, simply right click on the right side “Filename” box and select “Create directory”.
The right Filename window is where you can also rename files, create new files, download files to your computer, and change file permissions on individual files and folders.
Check with your hosting company for additional support on how to use FileZilla or click on the forum, HERE.
Once you configure the FileZilla software and learn how to use FTP to upload files from your computer, using the software will become second nature.


